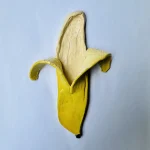
DIY Air Dry Clay Banana Trinket Tray
Ready to take on the banana challenge? Here is a simplified roadmap to help you create your very first fruit-inspired masterpiece! Don’t overthink it, we’re all learning here. 🎨
Materials
Air dry clay (any brand you can find is okay)
Acrylic rolling pin or cooking rolling pin
PVC mat or silicone mat (or non-stick surface)
Clay tools (or use toothpicks)
Wire end tool/ ribbon tool/ loop
Clay cutting tool (or small knife)
Cup of water or spray bottle
Acrylic paint (red, green (I mixed blue and yellow because I didn’t have green), white)
Gloss varnish
Paintbrushes
Paper towels
Optional: Sponge or silicone sculpting tool (or you can use your finger)
Instructions
1. Kneading
- Start by kneading your clay like pizza dough to get rid of air bubbles. This stops cracks later! 🍕
2. Rolling
- Roll the clay to 1/2 inch thickness. Flip and rotate it every few rolls so it doesn’t get stuck to your mat! 🔄
3. Shaping & Hollowing
- Trace and cut a curved banana base. Use your loop tool to scoop out the middle (Kurinuki style!) to create the tray area. 🥄
4. Attaching Peels
- Roll two thicker strips for "peels." Use the "score and slip" method (scratch the clay and add water) to stick them to the edges for a 3D look. 🤝
5. Drying
- Patience is key! Let it air dry for 48-72 hours until it turns fully white. No shortcuts! 🌬️
6. Painting
- Apply thin coats of acrylic. Use cream for the inside and yellow for the peel. Don't forget the brown stem! 🍌
7. Sealing
- Apply 2-3 coats of gloss varnish for that professional ceramic finish. Let each coat dry for 24 hours. ✨