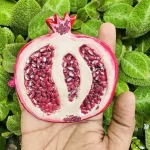
DIY Air Dry Clay Pomegranate Trinket Tray
Here’s your quick guide to making your pomegranate tray without the headaches (and mistakes!) I had. Let’s do this! 🤟🏾
Materials
Air dry clay (any reputed brand you can find is okay)
Acrylic rolling pin
PVC mat or silicone mat (or non-stick surface)
Clay crafting tools
Ribbon sculpting tool or a small spoon
Clay cutting tool (X-acto knife or small knife)
Cup of water or spray bottle
Acrylic paint (crimson, white, yellow)
Gloss varnish
Paintbrushes
Paper towels
Optional: Sponge or silicone sculpting tool (or you can use your finger)
Instructions
1. Knead the Clay 👐
- Take a fresh piece, tap a little water, and use the press-and-pull technique until it’s super soft. This prevents cracks later—trust me on this!
2. Roll It Out 📏
- Aim for ½ inch thickness. Don't forget to flip, turn, and rotate your slab while rolling so it doesn't stick to your mat.
3. Trace & Cut 🔪
- Trace your pomegranate shape, then cut carefully with your X-acto knife. Lift the knife as you go to keep those edges sharp and clean!
4. Hollow Out 🥄
- Using your ribbon tool, carve 3 chambers. Go slow—keep a solid base so you don't poke through the bottom!
5. Add the Seeds ⚪
- Crucial step: Score the inside of the chambers first so the seeds actually stick! Make little teardrop shapes and press them in firmly.
6. Dry Time ⏳
- Let it air dry for 48-72 hours in a cool, well-ventilated spot. No heaters, no sun, and absolutely no rushing! Slow drying = happy, crack-free clay.
7. Paint & Seal 🖌️✨
- Use acrylic paints for those vivid colors (thin, even coats!). Finally, seal with 2-3 coats of gloss varnish, letting it cure for 24 hours between coats.