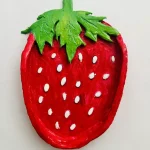
DIY Air Dry Clay Strawberry Trinket Tray
Create your own adorable strawberry trinket tray with this beginner-friendly air dry clay tutorial! 🍓
Materials
Air dry clay (any brand you can find is okay. I used Mont Marte)
Acrylic rolling pin or cooking rolling pin
PVC mat or silicone mat (or non-stick surface)
Clay tools (or use toothpicks)
Clay cutting tool (or small knife)
Fine sandpaper (good to have, but I didn’t have any)
Cup of water or spray bottle
Optional: Sponge or silicone sculpting tool (or you can use your finger)
Acrylic paint (red, green (I mixed blue and yellow because I didn’t have green), white)
Gloss varnish
Paintbrushes
Paper towels
Instructions
1. Knead, Knead, Knead! 🍕
- Don’t skip this! Pretend you're making pizza dough. Knead that clay until it's super soft so you get all the air bubbles out. Uneven air = cracks later. We don’t want that!
2. Roll the Clay
- Aim for 1/2 inch thickness. PRO TIP: To stop it from sticking to your mat, remember to flip, turn, and rotate your clay 90 degrees every few rolls. Trust me, it works like a charm! ✨
3. Trace & Cut the Base
- Draw your heart-shaped base (or use a template—don't be lazy like me!) and cut it out. Smooth out the edges with a wet finger.
4. Make and Attach the Leaves 🍃
- This part is tricky. Use a paper template so you don't waste time erasing and redrawing 6 times. Cut the leaves, smooth them, and set aside.
5. Attach Leaves to the Tray Base (Score & Slip)
- Use the "score and slip" method to attach everything. Score the areas where clay pieces meet, tap on a little water (or slip), and press gently. No loose joints here!
6. Add the Rim
- Cut thin, even straps and attach them around the tray base. Don’t forget to angle the edges where they meet for a seamless look.
7. Add Thin Clay Coil✨
- This is the secret to avoiding cracks! Roll a super thin "snake" of clay and press it around the inside joint where the rim meets the base. It helps spread the tension so your tray doesn't crack while drying.
8. Add the Seeds
- Make ~20 tiny teardrop shapes and stick them randomly on your tray. Don't overthink it!
9. Let it Dry
- Let it air dry for 48-72 hours. Seriously, don't rush this! If you paint it while it's wet, it will crack. Wait for it to turn pure white.
10. Paint & Seal 🎨
- Use acrylic paints for the color, then apply 1-2 thin coats of gloss varnish to seal it and give it that professional shine. Let it cure for 24 hours, and you're done!