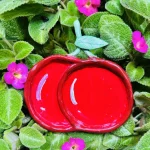
DIY Cherry Trinket Tray with Air Dry Clay
Learn how to make an easy DIY cherry trinket tray using air dry clay! Follow this simple step-by-step guide with beginner tips to avoid cracks and achieve a glossy and beautiful finish.
Materials
Air dry clay (DAS, Mont Marte or any reputed brand you can find is okay)
Acrylic rolling pin
PVC mat or silicone mat (or non-stick surface)
Clay crafting tools
Clay cutting tool (X-acto knife or small knife)
Cup of water or spray bottle
Jar lid
Acrylic paints
Gloss varnish
Paintbrushes
Paper towels
Optional: Sponge or silicone sculpting tool (or you can use your finger)
Instructions
Step 1: Knead & Condition the Clay 🧼
- Add a tiny bit of water and knead for 3–5 minutes. This releases air bubbles and spreads moisture evenly to prevent cracks as it dries! Don't over-water.
Step 2: Roll Out the Clay 🪵
- Press flat with your palm, then roll to 1/4 inch thickness with an acrylic rolling pin. Turn and rotate 90° often so it won't stick! Smooth out minor cracks with a damp finger.
Step 3: Trace & Cut the Cherry Base 🍒
- Place your jar lid twice to trace two overlapping cherry circles with a toothpick. Cut along the lines with an X-acto knife (lift the knife, don't drag!).
Step 4: Roll & Attach the Rim 🐍
- Roll a clay snake to uniform thickness. Score the rim base and tray edge with a toothpick, add a drop of water (or slip), and wrap it around the tray edge.
Step 5: Reinforce the Joint 💪
- Roll a super thin clay coil and smooth it inside the corner joint between the base and rim. This distributes drying stress and stops the rim from snapping off!
Step 6: Sculpt Stem & Leaf 🍃
- Shape a tiny clay stem and leaf. Score & attach them to the top of your cherries using a splash of water.
Step 7: Slow Dry (48 Hours) 🌬️
- Let it dry in a cool, ventilated room away from sunlight or heat. Flip it occasionally to keep the base flat and warp-free.
Step 8: Paint & Seal 🎨
- Paint the cherry center vibrant red, the rim dark red, and stem/leaf pale green using 2–3 thin coats of acrylics. Once dry, seal with 2–3 thin coats of gloss varnish for a shiny ceramic look!
Too much water = cracks! Only use enough to soften the clay.
Never rush drying under direct sunlight or heat, or uneven shrinkage will crack your piece.
Don't forget to flip and rotate the clay slab while rolling to avoid sticky tears.