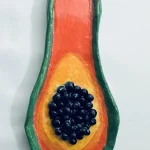
DIY Clay Papaya Trinket Tray
In this beginner-friendly guide, I’ll walk you through creating a cute, vibrant papaya trinket tray using air dry clay. From kneading and rolling to my unique rim-shaping trick, I'll show you how to craft this adorable piece without any fancy tools. Let’s get creative!
Materials
- Air dry clay
- Acrylic rolling pin or cooking rolling pin
- PVC mat or silicone mat or non-stick surface
- Clay tools or use toothpicks
- Clay cutting tool or small knife
- Fine sandpaper good to have, but I didn’t have any
- Cup of water or spray bottle
- Paper towels
- Optional: Sponge or silicone sculpting tool or you can use your finger
- Acrylic paint black, white, crimson, green, yellow
- Gloss varnish
- Paintbrushes
- Paper towels
Instructions
1. Knead the clay
- Work that clay until it’s soft and free of air bubbles.
2. Roll it out
- Use a rolling pin on a mat, and don’t forget to rotate it so it doesn’t stick! Aim for ½ inch thickness.
3. Cut your shape
- Use a template to get that perfect papaya shape, then cut and smooth the edges.
4. Form the rim
- Gently fold the edges upward for a seamless, sturdy finish. No extra clay needed! 🤲
5. Make and add the seeds
- Roll small clay balls, score the center, and press them in with a little water. 🥭
6. Let it dry
- Let it sit in a cool, ventilated spot for 24-48 hours. ⏳
7. Paint the tray
- Apply your acrylics in thin, even layers—orange, yellow, green, and black for those seeds! 🖌️
8. Seal the tray
- Protect your tray with a gloss varnish or resin. Let it cure, and you’re all set! ✨