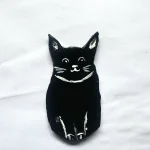
DIY Halloween Black Cat Craft with Air Dry Clay 🐾
If you're in a rush or just want a quick refresher without re-reading the whole story, don't worry! I've put together a handy summary card below with all the key steps and supplies you need to bring your spooky little cat craft to life. 🐱✨
Materials
Air dry clay (DAS, Mont Marte, Jovi, or any reputed brand you can find is okay)
Acrylic rolling pin
PVC mat or silicone mat (or non-stick surface)
Clay crafting tools
Clay cutting tool (X-acto knife or small knife)
Cup of water or spray bottle
Acrylic paints
Gloss varnish
Paintbrushes
Paper towels
A pair of scissors
Optional: Sponge or silicone sculpting tool (or you can use your finger)
Instructions
1. Knead & Roll 🍕
- Condition your air dry clay with a little water and roll it out evenly.
2. Trace & Cut ✂️
- Place your bat paper template on the slab, trace the outlines, and cut out the shape.
3. Spot the Cat 🐈⬛
- If the tray wings crack or break while drying, smooth or sand down the broken edges of the central body—the bat body and ears double perfectly as a sitting cat silhouette!
4. Paint 🖌️
- Apply 2–3 coats of black acrylic paint as the base. Add cute eyes, ears, nose, and leg details using white paint.
5. Seal & Protect 🦭
- Finish with 2–3 thin coats of gloss varnish for a sleek, ceramic-like finish. Let dry for 24 hours to cure! ✨