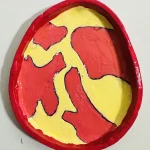
DIY Trinket Tray
An air dry clay trinket tray is a perfect beginner-friendly DIY project that allows you to practice essential techniques like shaping, attaching, smoothing, painting, and sealing, all without the need for a kiln or baking.
Cost: $6
Materials
Air dry clay
Acrylic rolling pin or cooking rolling pin
PVC mat or silicone mat or unsealed wooden mat
Clay tools
Clay cutting tool (or small knife)
Fine sandpaper
Cup of water or spray bottle
Paper towels
A ruler
Sponge or silicone sculpting tool (optional)
Acrylic paint (pink, yellow, white)
Paintbrushes
Gloss varnish or UV resin
Instructions
Step 1: Condition the Clay
- Place your clay on the mat, add a little water, and knead it well. This creates a smooth, crack-free texture. Remember, conditioning comes first! 🥇
Step 2: Roll it Out
- Roll your clay to a 1/4 inch thickness.
Pro Tip: To keep it from sticking and ripping (I learned this the hard way!), flip, rotate, and lift the clay every few rolls. Turn it 90 degrees each time you flip it! 🍕
Step 3: Cut the Base
- Use a cutting tool or cookie cutter to shape your base. You can go round, square, or freestyle. Remove the excess clay—don't throw it out! We need it for the rim. ✂️
Step 4: Smooth the Edges
- Dip your finger in water and gently sweep it over the surface and edges. A damp sponge works, too. This prevents cracks and makes painting way easier later. 💧
Step 5: Make the Rim
- Take that excess clay, condition it again, and roll it out to a 1/4 inch thickness. Cut a long, rectangular strip for your rim.
Step 6: Score and Slip
- Score a cross-hatch pattern on the edges of both your base and your rim. Tap a little water onto the scored areas—this acts like glue and creates a super strong bond. 🛠️
Step 7: Attach the Rim
- Gently press the rim along the edge of your base. Trim any excess, then blend the ends together with your fingers and a drop of water. 🥣
Step 8: Reinforce the Joint
- Roll a tiny coil of clay and place it inside the joint where the rim meets the base. Smooth and blend it in. It helps distribute weight and prevents cracks while drying. Highly recommended! ✅
Step 9: Let it Dry
- Leave it in a cool, well-ventilated spot for 24-48 hours. Avoid direct sun, or it might crack. Slow and steady wins the race! 👍
Step 10: Sanding
- Once fully dry, lightly sand the surface and edges with fine-grit sandpaper for a professional finish. Wipe away the dust with a paper towel. 💡
Step 11: Paint Your Design
- Sketch your design with a pencil, then grab your acrylic paints. Tube acrylics are usually easier to manage than bottled ones. 🖌️
Step 12: Seal it Up
- This is non-negotiable! Use a proper gloss varnish or UV resin to protect your tray from moisture. (And please, don't use nail polish—my wife still doesn't know about that one!) 💅
Video
Notes
- Please read blog post in its entirety for more tips + tricks.
Don't forget to tag @clayandmestudios with your creations! Cheers! 🤟🏾