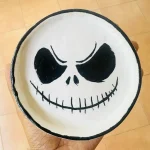
How I Made a Jack Skellington Tray with Air Dry Clay
Learn how I made this spooky cute Jack Skellington tray with air dry clay! Follow my easy step by step tutorial to craft your own Halloween trinket dish.
Materials
Air dry clay (DAS, Mont Marte, Jovi, or any reputed brand you can find is okay)
Acrylic rolling pin
PVC mat or silicone mat
Metal jar lid
Clay crafting tools
Clay cutting tool (X-acto knife or small knife)
Cup of water or spray bottle
Acrylic paints (white and black)
Gloss varnish
Paintbrushes
Drawing pen or pencil
Paper towels
Optional: Sponge or silicone sculpting tool (or you can use your finger)
Instructions
Step 1: Prep & Knead 🤹
- Knead fresh clay for 3–5 mins with a splash of water to banish air bubbles and prevent cracking.
Step 2: Roll It Out 🍕
- Roll clay on a non-stick surface to an even ¼ inch thickness (flip often to avoid sticking!).
Step 3: Cut the Base ⭕
- Trace and cut a neat circle using a jar lid, then smooth the edges with a wet finger.
Step 4: Form the Rim 🐍
- Roll a long clay strip (¼ inch thick) to make the tray’s outer wall.
Step 5: Score & Attach 🧩
- Cross-hatch the edges, apply water or slip, and attach the rim firmly to the base.
Step 6: Reinforce 🛠️
- Blend a super thin clay coil along the inner seam to secure the joint.
Step 7: Dry & Sand ⏳
- Let it dry in a ventilated spot for 48–72 hours, then sand smoothly with fine sandpaper.
Step 8: Draw & Paint 🎨
- Pencil Jack's spooky face, paint the whole tray white with acrylics, and fill in details in black.
Step 9: Seal & Protect ✨
- Apply 2–3 coats of gloss varnish for a glossy, water-resistant ceramic look!