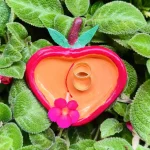
Peach Jewelry Dish with Air Dry Clay Guide
Looking for a quick, beginner-friendly summary of this project? Check out the handy reference card below for a fast breakdown of the materials, key steps, and essential tips to create your very own cute peach jewelry dish!
Materials
Air dry clay (DAS, Mont Marte, Jovi or any reputed brand you can find is okay)
Acrylic rolling pin
PVC mat or silicone mat (or non-stick surface)
Clay crafting tools
Clay cutting tool (X-acto knife or small knife)
Cup of water or spray bottle
Acrylic paints
Gloss varnish
Paintbrushes
Paper towels
Optional: Sponge or silicone sculpting tool (or you can use your finger)
Instructions
1. Condition & Knead
- Tap a little water onto fresh clay and knead thoroughly to distribute moisture evenly and prevent cracking. 🤲
2. Roll it Out
- Roll clay to an even ¼-inch thickness on a non-stick surface, flipping frequently to avoid sticking. 🗞️
3. Cut the Base
- Freehand-trace or use a template to cut out a peach shape using your knife. ✂️
4. Attach the Rim
- Roll a clay snake, score both the edge of the base and rim, apply water/slip, and press into place. Cut ends at an angle to join smoothly. 🐍
5. Reinforce (Optional)
- Add a ultra-thin clay coil along the inside seam and smooth it out with a tool to lock the rim to the base. 🔍
6. Add Stem & Leaves
- Score and attach a small stem and leaf shapes onto the top rim. 🌿
7. Slow Dry
- Let dry naturally in a cool, ventilated space for 48–72 hours until pure white. Avoid heat or direct sun! 🌬️
8. Paint & Seal
- Paint with acrylics in thin coats, let dry for 2 hours, then seal with gloss varnish or resin to protect against moisture. ✨